Cosmetic World

Cosmetic World
Inner Beauty Outside

Friday, January 29, 2016

Favorite Hair Brushes and Hot Tools

   Going through hair school I was introduced to some of my favorite hair tools that I use today. Did you guys know there are brushes that straighten your hair when you heat them up?! I definitely didnt when I started school. Here are some of my favorite brushes and hot tools that you will find in my daily routines.

1. Paul Mitchell 407s Styling Brush
407s Styling Brush
   This brush is one of my favorite unique brushes to use. It was made with lava rock extract so that when you use this brush with heat it will put the oils back into your hair instead of drying it out. This brush is a little bulky and is only good for when you are blow drying hair but it can replace the use of a flat iron! I put the blow dryer againts the bristle base for 10-15 seconds heating the brush up then taking the damp section of hair I blow dry the hair with the brush and blow dryer. I was amazed at how smooth and silky hair was after using this brush. It definitely takes time off of getting straight hair. This brush can be used for curly hair but you still will want a flat iron to complete that straight look. I have very curly hair myself so I know the struggle to get straight hair. I would recommend this brush to someone who does hair, or has wavy hair and enjoys doing their hair every day.

2. Paul Mitchell Pro Tools 402s Hair Brush
402s Styling Brush
   This brush is my go to brush every day. I feel it helps get through my curly hair and gets the job done right. It can be a rough brush if not used carefully so it takes a bit to get use to like any hair brush. It comes in different colors but I love being fun and bright so this brush definitely expresses my personality. I would recommend this brush to anyone who enjoys brushing through their hair.


3. Paul Mitchell Butterfly Clips
   I know butterfly clips can either be a blessing or a nightmare. I find myself using these when I am straightening my curly hair best or dying my hair. They have great hold and I haven't had any break or snap yet. I would recommend these clips to those with thick hair, or curly hair and need to hold it up or down while styling.
Butterfly Clips

4. Paul Mitchell Hair Clip
   These clips I love using to hold my hair back while I am doing my makeup. They are simple clips but I wouldnt recommend using them to hold up lots of hair. They are a weaker set of clips but I definitely enjoy using them while cutting hair. I like them because they are thin and small so they dont get in the way as easily but they do snap easily. With careful use these clips are great for thin hair or for any basic clips.

5. Paul Mitchell 308 Comb
308 Comb & Clip
   I LOVE THIS COMB! It may just be another comb to some people but I use it for cutting because it has a ruler type on the back so you can see how much hair you are actually cutting off. I also enjoy using this comb for teasing hair and getting volume. I would recommend this comb to teasing hair lovers, and hair stylist.

6. Paul Mitchell Express Ionsmooth Iron
   This is my life, I have pretty curly hair so it is important to me to have a good flat iron and this one suits my needs. This hot tool also has the ionic lava rock in it, creating that shiny healthy look to my hair. I use this often and would recommend it to anyone who enjoys straightening their hair. It heats up in three seconds and has different heat levels and is very resistant. I have had this Flat Iron for two years now and havent had any issues with it. I love it.
Express Ionsmooth Iron

7. Remington Curling Wand
   This want in particular was only 20$ at walmart and has lasted me now 7 years. I love this tool and it has worked for me very well. The only down side to it, is that it is one size from big to small so its a one type of curl but if you know how fast your hair curls and heat then you can create different shapes and dozens of cute styles. I would highly recommend this product to anyone who isnt looking to spend 100$ on a new hot tool but that is looking for something that will last a while.

Remington Curling Wand


Thursday, January 28, 2016

How To Prepare For Your Esthict/Cosmo Finals

   So anyone who has or is currently going through Aesthetics School or Cosmetology like I am knows the stress of finals. I have been through both schools at separate times and can tell you there is no difference in the stress level or the testing. I felt like I should post about how I study for finals any of you who are about to start the cramming will have a good base and wont need the stress!


   The first thing you have to do is not look at finals as a horror movie, yes studying and the word finals may seem like a nightmare but you just have to look at it as a game of testing all those skills you have been learning ;) pick your hardest chapters to start with and drill yourself with those questions first. If you only drill yourself on the easy ones first the harder ones will slip your mind and then it will become a nightmare. I have found the only way I learn the best is either on Quizlet, or making flash cards. Flash cards are life! I try and study a chapter or two a day so I dont cram everything in all at one time. Once I have memorized a chapter I mix another chapter into it and add more as I progress.

    Another really important thing to know when studying is to take breaks every 30 minutes or so. Your brain can only handle so much knowledge before you shut down and stop retaining anything. You should take 5-10 minute breaks and listen to music, watch tv, or even go run around and get some exercise to keep the body moving. DONT drink soda, this will give you momentarly energy but will be gone and you will have a crashing point sooner then expected making studying much harder. Have fruit, some of your favorite snacks, music, and good lighting to help set the mood for you. Study in a place where you can not be distracted and really take some time for yourself.

   It is really important that you dedicate yourself to studying when it comes to finals because I can promise you... ITS NOT EASY... Taking finals can be one of the most stressful things on the planet but with the right mindset and tools you can actually enjoy yourself and pass those test with flying colors!

Wednesday, January 27, 2016

Clean Makeup Brushes

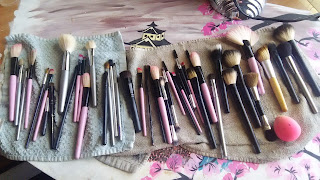
      Everyone has their own way of cleaning their makeup brushes and the options are endless. I like to keep mine as simple as possible because depending on the amount of brushes you have it could take awhile. As I have done makeup over time ive learned how the buildup of makeup in the brush can affect how your application is greatly. I have started deep cleaning my brushes once every week or week and a half depending on use. Even if I dont use all the brushes I have I will still wash all of them because dust and dirt from the air will build up on the brushes if they are just sitting there. If you dont clean your brushes often then every time you touch your face with that brush all that dirt and dust will build up on your skin and can cause acne and other skin conditions. If you guys have a brush cleanser spray that you use after using your brushes then deep cleaning them once a week might be too much because you dont want your brushes falling apart from over washing them. 
   So this is my routine that I will usually follow and all the products that I use to clean them.

1. I will use a dish washing soap
2. oil
3. bowl
4. water
5. some sort of scrubber to clean your brushes with
6. towels 
7. blow dryer


    To start I will usually grab a bowl and put a good amount of dish soap in it and then pour a little oil I use in the kitchen in the bowl as well. The soap will get all the bacteria out of the brush and the oil will cleanse the bristles on the brush and keep them soft, preventing them from drying out.  It is important that when you are washing your brushes that you always point the brush down so the water does not run up into the wood or base of the brush. If water does get up there it can cause the bristles to fall out and the brush could actually fall apart. So ill take whatever brush im washing and ill dip it into the soap and oil and ill then scrub it againts my little foam scrubber. You can get actual brush scrubbers online and they are also fantastic, this is just what I had at the moment to clean them. I use warm water but not to hot and I scrub the brush and rinse as much as needed. After cleaning all my brushes ill lay them out to dry and I will shape them so they will dry to their original shape. Ill then take my blow dryer on low and cool and lightly blow through the brushes (keeping them angled down to move water out of brush). I'll then set them out to dry usually over night so they arent damp the next time I need to use them. This process does take awhile but I find that my brushes last a lot longer and my makeup application is a lot smoother so it is worth taking the time to wash them.


please comment for more post on things you want to see or hear about:)


Tuesday, January 26, 2016

Favorite Products!

     I dont think I could actually pick my number one favorite product but I decided I would list a few for you guys so you could see what I am currently using and what I am into. Some products are higher end and some you can get from your local store around town. I prefer to have a mix of makeup like this so that you guys can see that you dont always have to have the most expensive makeup on the market to look good. 

1. Two Face Chocolate Bar
     Ok to start off with I love chocolate, this pallet was meant for me. It is my number one go to for my smokey or deep eye looks. I really enjoy using this pallet for its variety of colors and it even smells like chocolate!!! It cant get better then that! I also enjoy this pallet because they have created more then one chocolate bar so you can get all the perfect color mixes. You can find this product at Ulta or Sephora or online as well.


2. Naked Basics Palette 
     I was given this palette as a gift and I instantly fell in love with it. This palette is fantastic for those days when I am running out of my house and need just a touch of color to my eyes. It is a great natural look palette and its colors are very pigmented. I also find myself using this palette for my eyebrows and eye liner for softer appearances. This palette is great for a basic start to wearing makeup and I would recommend anyone to invest in it. It may seem like a smaller palette but I have had mine for months now and would say it is worth its money. You can find this product online or at Ulta or Sephora.


3. CAO COSMETICS 
    
These cream palettes have become my best friend. I wasnt really into cream makeup for a while and while attending Paul Mitchell we received this kit. Once I learned how to blend cream makeup and contour I was hooked. I cant go a day without using these palettes. I really love their kits because you can either order colors in a complete palette or order each cream individually. You can mix and match creams making your options endless. This product can only be found online and is a higher end product so those of you who are into online shopping and are into more higher end cosmetics, this is the product for you!


4. Neutrogena Powder and Long Wear Liquid Foundation
    My last current favorite product is the Neutrogena foundation line. I struggle with acne and redness so full coverage is very important to me and I have found that this foundation achieves just that. The liquid consistency is a little thicker so a little goes a long way but I really do enjoy using this product. I would recommend using a beauty blender to buff the foundation lightly into the skin and add more as needed. The powder is a loose form and I really like this because it still gives me that matte look but not like I pounded my face with makeup. I dont have a specific preference on press powder or loose powder. Both work for me as long as I can get that matte look to it. I also really love these products because I can blend them with my CAO cosmetic creams great, these products can be found at your local drug store and are very reasonably priced.

5 Step Guide To Basic Makeup

      I get a lot of girls asking me the same question over and over again, "what are the basics for makeup?" It seems like a pretty easy question but after much thinking my answer has taken a week to process. I help a lot girls do their makeup for prom and recently I took one of them shopping to get her some cosmetic supplies she needed. Thats when it occured to me that I had to only show her the basics of her needs. So after going down every isle and looking at many options I have come up with a 5 step process to help any girl get on her feet with makeup. 

1. Concealer
   Concealer may seem like a big word to some girls but it really is a fantastic and simple tool to use. If you apply a few dots from the corner of your eye under the eye to your temple and blend it in with your finger you will find a major difference. It leaves a brighter and more awake look to the face making your eyes pop.

2. Powder
   There are many types of powders but for basics you will want to lean more towards a loose powder. Lose powder is very light and leaves a much more natural look on the face. I would recommend buying a powder either your skin tone, one shade lighter, or tansluecent just so you can cover up the shiny look to your face.

3. Blush
   Adding just a touch of blush to the face will bring a natural and healthy glow to the skin and will give the appearance of a brighter look. Makeup sure not to over load on this step though, this could lead to more of a clown look.

4. Mascara
   You would not believe the amazing difference a little mascara adds to the face! Now all mascara is different so pick whichever kind suites you and apply to eye lashes, you can curl your lashes with and eyelash curler for an extra boost if you feel the need to but make sure to curl them before applying the mascara.

5. Lip Gloss
   The last and final step to complete a simple but glamours face is lip gloss. A girls best friend! You can do any color of lip gloss you would prefer but a good start would be a nice clear, or light peachy to pink tone. If you are in a daring mood shoot for more richer tones such as browns, reds, and even deep purples!


This is the simple 5 step guide to basic makeup, not that hard right? If you start by applying these five steps you can work your way into the makeup world very quickly, or you may find this suites all your needs. Whatever you choose to do this should help you get off your feet:)